How to Install Libraries in Proteus 8: 2 Easy Methods Explained (Step-by-Step Guide)
Proteus is one of the most powerful circuit simulation and PCB design tools used by electronics engineers, students, and hobbyists worldwide. However, the default component library doesn’t include every sensor, module, or microcontroller you might need for your projects. That’s where installing external libraries becomes essential.
In this comprehensive guide, you’ll learn two complete methods to install libraries in Proteus 8 — whether you’re adding Arduino libraries, ESP32 modules, sensors, LCD displays, or any other electronic components for simulation.
Why Install External Libraries in Proteus?
The default Proteus installation comes with thousands of components, but specialized components like:
- Arduino boards (Uno, Mega, Nano)
- ESP32 and ESP8266 WiFi modules
- Advanced sensors (ultrasonic, heartbeat, gas sensors)
- OLED and TFT displays
- Motor drivers and relay modules
…often need to be downloaded and installed separately. Installing these libraries expands your simulation capabilities and allows you to test complex embedded systems before building physical prototypes.
What You’ll Need Before Starting
Before installing libraries, make sure you have:
- Proteus 8 Professional installed on your computer
- Library files downloaded (usually in .LIB, .IDX, or .HEX format)
- Administrator access to modify Proteus installation folders
- Basic knowledge of file navigation in Windows
Method 1: Manual Library Installation (Traditional Method)
This method involves manually copying library files into the Proteus installation directory. It’s straightforward and works for most third-party libraries.
Step 1: Download the Required Library Files
First, you need to obtain the library files for the components you want to add:
- Visit trusted sources like the official Proteus website or reputable electronics forums
- Download the library package (usually a .zip or .rar file)
- Extract the files — you should see files with extensions like:
- .LIB (Library file containing component data)
- .IDX (Index file for component lookup)
- .HEX (Firmware files for microcontrollers)
- .MDF (Model definition files)
Common file types explained:
- LIB files: Contain the actual component definitions
- IDX files: Index files that help Proteus quickly search components
- HEX files: Arduino or microcontroller program files for simulation
Step 2: Locate Your Proteus Installation Directory
You need to find where Proteus 8 is installed on your system:
Default installation paths:
- C:\Program Files (x86)\Labcenter Electronics\Proteus 8 Professional
- C:\Program Files\Labcenter Electronics\Proteus 8 Professional
Once you’re in the Proteus folder, look for these subdirectories:
- LIBRARY folder (for .LIB and .IDX files)
- DATA folder (for .HEX and other simulation files)
- MODELS folder (for .MDF model files)
Step 3: Copy Library Files to the Correct Folders
Now it’s time to install the library:
- Copy .LIB and .IDX files to the LIBRARY folder
- Navigate to:
C:\Program Files (x86)\Labcenter Electronics\Proteus 8 Professional\LIBRARY - Paste your downloaded .LIB and .IDX files here
- Navigate to:
- Copy .HEX files to the DATA folder
- Navigate to:
C:\Program Files (x86)\Labcenter Electronics\Proteus 8 Professional\DATA - Paste any .HEX or firmware files here
- Navigate to:
- Copy .MDF files to the MODELS folder (if applicable)
Important Note: You may need administrator permission to paste files into these folders. Right-click and select “Run as administrator” if prompted.
Step 4: Restart Proteus and Verify Installation
- Close Proteus completely if it’s running
- Reopen Proteus 8 Professional
- Click on the “P” (Pick from Libraries) button in the component toolbar
- Search for your newly installed component by name
- If it appears in the search results, congratulations! The library is successfully installed.
Step 5: Test the Component
To ensure everything works properly:
- Place the component on your workspace
- Double-click to check its properties
- For Arduino or microcontroller libraries, try loading a simple .HEX file
- Run a basic simulation to confirm functionality
Method 2: Using Proteus Library Manager (Automatic Installation)
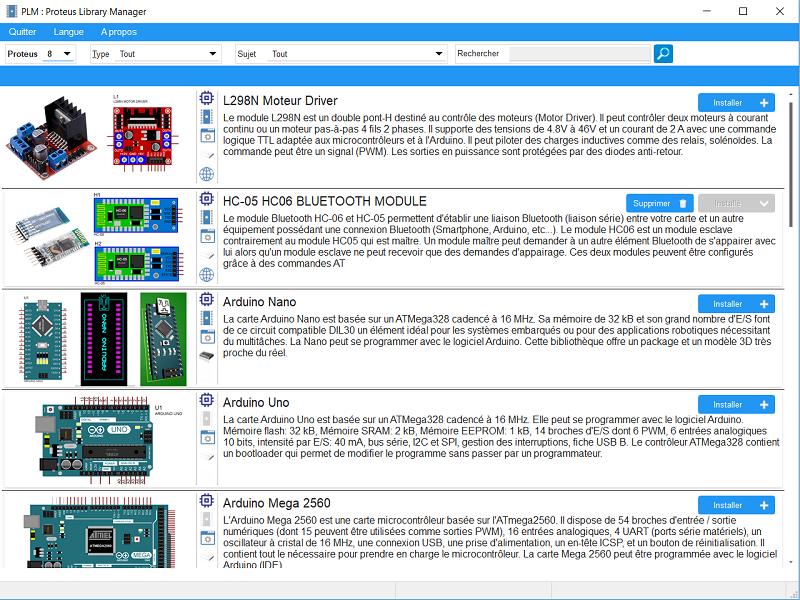
The Proteus Library Manager is a dedicated software tool that simplifies the process of installing, managing, and updating component libraries. This method is faster, more organized, and reduces the risk of file placement errors.
What is Proteus Library Manager?
Proteus Library Manager (Bibliothèques de composants pour Proteus) is an official or community-supported tool that:
- Provides a centralized repository of pre-tested libraries
- Automates the installation process
- Allows easy updates and removal of libraries
- Maintains library organization without manual file copying
- Supports batch installation of multiple components
Step 1: Download and Install Proteus Library Manager
- Visit the official Library Manager website or trusted electronics resource
- Download the Proteus Library Manager installer
- Run the installer with administrator privileges
- Follow the on-screen instructions to complete installation
- The software will automatically detect your Proteus installation path
Step 2: Launch Proteus Library Manager
- Open the Proteus Library Manager application
- The software will scan your system for the Proteus installation
- Verify that the correct Proteus version (8 Professional) is detected
- The interface will display available libraries categorized by type:
- Microcontrollers (Arduino, PIC, AVR, ESP32)
- Sensors (Temperature, Ultrasonic, IR, Gas)
- Displays (LCD, OLED, 7-Segment)
- Communication modules (Bluetooth, WiFi, GSM)
- Motor drivers and power electronics
Step 3: Browse and Select Libraries
The Library Manager provides an intuitive interface:
- Browse by category: Click on component categories to see available libraries
- Search function: Use the search bar to find specific components quickly
- Preview information: View component details, pin configurations, and compatibility notes
- Check library status: See which libraries are already installed, which have updates available
Step 4: Install Selected Libraries
Installing libraries through the manager is simple:
- Select components: Check the boxes next to libraries you want to install
- Review dependencies: The manager will notify you of any required supporting files
- Click “Install”: The software automatically:
- Downloads the latest library files
- Places files in correct Proteus directories
- Updates index files
- Registers components in Proteus database
- Monitor progress: A progress bar shows download and installation status
- Installation complete: You’ll receive confirmation when the process finishes
Step 5: Configure Custom Library Paths (Optional)
For advanced users who want to maintain libraries in custom locations:
- Go to Settings or Preferences in Library Manager
- Click “Add Custom Library Path”
- Browse to your preferred folder location
- The manager will create links to this folder in Proteus
- You can now keep libraries organized in external directories without cluttering the main installation
Benefits of custom paths:
- Keep libraries separate from Proteus installation
- Easier backup and version control
- Share library folders across multiple Proteus installations
- Simplify reinstallation after software updates
Step 6: Update and Manage Installed Libraries
The Library Manager makes maintenance easy:
To update libraries:
- Open Library Manager
- Check the “Updates Available” section
- Select libraries to update
- Click “Update All” or update individually
To remove libraries:
- Go to “Installed Libraries” tab
- Select unwanted libraries
- Click “Uninstall” — files are safely removed without affecting Proteus core files
To verify installation:
- Use the “Verify Integrity” function
- The manager checks for missing or corrupted files
- Automatically repairs or reinstalls problematic libraries
Step 7: Restart Proteus and Test
- Close Proteus if it’s running
- Launch Proteus 8 Professional
- The Library Manager automatically refreshes component indexes
- Open component picker (P button)
- Search for your newly installed components
- They should appear with proper icons and documentation
Comparison: Manual vs. Library Manager Method
FeatureManual InstallationProteus Library ManagerEase of UseRequires file navigation knowledgeUser-friendly interfaceSpeedSlower, one library at a timeFast, batch installationError RiskHigher (wrong folder placement)Lower (automated)UpdatesManual redownload and replacementOne-click updatesOrganizationFiles scattered in system foldersCentralized managementCustom PathsRequires manual configurationBuilt-in supportBest ForSingle library, offline installationMultiple libraries, ongoing use
Common Errors and How to Fix Them
Error 1: “Component Not Found”
Causes:
- Library files placed in wrong folder
- Index files (.IDX) missing or not updated
- Proteus not restarted after installation
Solutions:
- Verify files are in LIBRARY folder
- Ensure both .LIB and .IDX files are present
- Restart Proteus completely
- Use Library Manager’s “Refresh Index” function
Error 2: “Model Not Found” During Simulation
Causes:
- .HEX or .MDF files missing
- Files placed in wrong DATA or MODELS folder
Solutions:
- Check if .HEX files are in DATA folder
- Verify .MDF model files are in MODELS folder
- Re-download library package if files are missing
Error 3: Permission Denied When Copying Files
Causes:
- Insufficient administrator privileges
- Proteus running in background
Solutions:
- Close Proteus completely
- Run file explorer as administrator
- Disable any file protection software temporarily
Error 4: Library Manager Can’t Detect Proteus Installation
Causes:
- Non-standard installation path
- Multiple Proteus versions installed
Solutions:
- Manually set Proteus path in Library Manager settings
- Ensure you’re pointing to Proteus 8 Professional, not student version
Error 5: Components Appear but Don’t Simulate Properly
Causes:
- Incomplete library installation
- Missing firmware files
- Incompatible Proteus version
Solutions:
- Reinstall the complete library package
- Check component documentation for required additional files
- Verify library compatibility with Proteus 8
Tips for Managing Proteus Libraries Effectively
1. Keep Libraries Organized
Create a dedicated folder structure:
My Documents/Proteus Libraries/
├── Arduino/
├── Sensors/
├── Displays/
├── Communication/
└── Custom Components/
2. Backup Before Major Installations
- Make a copy of your LIBRARY and DATA folders
- This allows easy rollback if something goes wrong
3. Document Your Installations
Keep a text file listing:
- Library names and versions
- Installation dates
- Source websites
- Any special configuration notes
4. Test Immediately After Installation
- Don’t wait to test new libraries
- Create a simple test circuit to verify functionality
- Check both component placement and simulation
5. Keep Libraries Updated
- Regularly check for updated versions
- Use Library Manager’s update function
- Updated libraries often fix bugs and add features
6. Use Trusted Sources Only
Download libraries from:
- Official Proteus website
- Manufacturer websites (Arduino, Espressif, etc.)
- Reputable electronics education sites
- Verified community forums
Avoid:
- Unknown file-sharing sites
- Unverified downloads
- Libraries without documentation
Best Practices for Proteus Library Installation
- Always read the README file included with library packages
- Check compatibility — ensure libraries are for Proteus 8
- Install one library at a time when troubleshooting
- Keep original library packages for easy reinstallation
- Use descriptive names when organizing custom libraries
- Regular maintenance — remove unused libraries to keep Proteus fast
- Verify licenses — ensure you have rights to use commercial libraries
Popular Libraries You Should Install
Essential Arduino Libraries:
- Arduino Uno, Mega, Nano boards
- Arduino sensor shields
- Common Arduino modules
Communication Modules:
- ESP32 and ESP8266 WiFi modules
- Bluetooth HC-05/HC-06
- GSM/GPRS modules
- RF433MHz modules
Sensors:
- Ultrasonic distance sensors (HC-SR04)
- Temperature sensors (DHT11, DHT22, DS18B20)
- Gas sensors (MQ series)
- PIR motion sensors
- Heartbeat sensors
Displays:
- 16×2 and 20×4 LCD displays
- OLED displays (SSD1306)
- TFT color displays
- 7-segment displays
Motor Control:
- L298N motor driver
- Stepper motor drivers
- Servo motors
- DC motor modules
Troubleshooting Checklist
Before seeking help, verify:
✅ Files are extracted from .zip/.rar archives
✅ Both .LIB and .IDX files are present
✅ Files are in correct folders (LIBRARY, DATA, MODELS)
✅ Proteus has been completely closed and reopened
✅ You have administrator privileges
✅ Antivirus isn’t blocking file operations
✅ Library is compatible with Proteus 8
✅ All dependencies are installed
✅ Windows file extensions are visible (not hidden)
✅ File paths don’t contain special characters
Conclusion
Installing libraries in Proteus 8 doesn’t have to be complicated. Whether you choose the manual installation method for quick, one-time additions, or the Proteus Library Manager for comprehensive library management, both approaches will expand your simulation capabilities significantly.
Key takeaways:
- Manual method gives you direct control but requires careful file management
- Library Manager automates the process and provides ongoing maintenance tools
- Always use trusted sources and verify installations with test circuits
- Keep your libraries organized and documented for future reference
With these libraries installed, you can simulate Arduino projects, ESP32 IoT devices, complex sensor networks, and much more — all before building the physical circuit. This saves time, money, and helps you catch design errors early.
Recommended Resources
Download Proteus Libraries:
- Official Proteus website: labcenter.com
- Electronics component libraries repositories
- Arduino and ESP32 official resources
Proteus Library Manager:
- Search for “Proteus Library Manager” or “Bibliothèques de composants pour Proteus”
- Check community forums for the latest versions
- Read user reviews before downloading
Learning Resources:
- Proteus official documentation
- YouTube tutorials on circuit simulation
- Electronics engineering forums and communities
Final Tips
🔹 Start simple — Install one or two essential libraries first
🔹 Learn as you go — Experiment with different components
🔹 Join communities — Share experiences and get help from other users
🔹 Stay legal — Use only legitimate software and licensed libraries
🔹 Keep learning — Proteus is constantly evolving with new features
Now you’re ready to expand your Proteus library and take your circuit simulations to the next level! Whether you’re a student working on academic projects, a hobbyist building Arduino prototypes, or a professional engineer designing complex embedded systems, these installation methods will serve you well.
Happy simulating! 🚀
Did you find this guide helpful? Share it with fellow electronics enthusiasts and students who are learning Proteus. If you have questions or need help with specific library installations, feel free to reach out through electronics forums or Proteus community groups.